Easy to Draw Art Easy to Draw Kawaii Pony
Today we'll draw a cute pony. Information technology may wait very simple, but it volition be based on a realistic horse—just in less avant-garde class. You'll larn how to build a "base" for a drawing and how to measure with lines. Yous merely need:
- a pencil (the softer, the better)
- 2 sheets of newspaper (it can be a cheap copy newspaper)
- a brawl-indicate pen or a mark (something that makes dark lines)
Y'all don't need an eraser!


1. Depict the Body
Pace ane
Accept one canvas of paper. Imagine an oval and sketch it very lightly with your pencil. Don't describe information technology all with one line. Effort to use brusque lines with gaps.


Step ii
Separate the oval into halves. If you lot don't know how, here's a style:
Observe the middle of the oval and mark it with a dot. And so draw ane dot on the correct and 1 on the left. Bring together them with a line to divide the oval into halves.


Step three
Draw a circle next to the oval. Make it a bit smaller.


Step four
Now bring together up both shapes with curved lines. The trunk is finished!


ii. Draw the Legs
Pace 1
Beginning draw ii lines to find the right place for the legs. The front one (here: left) should be in the front one-half of the chest-oval. The back 1 should exist placed in the dorsum half of the bum-circle.


Step 2
Marker the places where both lines touch the body (1) and the ground (2). Can you come across a line betwixt them? Marker the middle of it.


Step 3
At present mark the center of each half.


Step iv
These marks will help us put all the parts of each leg in the correct places. We can draw lines to plan how wide each of them will be:
- The base of the hoof: the longer this line, the more similar a draft horse the pony will look.
- The meridian of the hoof: make it a bit shorter than the hoof.
- The wrist/heel: make it fifty-fifty shorter.
- The elbow: brand it longer than the hoof.


Footstep 5
Now outline the lines with ovals or circles:
- Hoof and elbow with an oval
- Wrist/heel with a circumvolve


Footstep half dozen
We at present have enough lines to draw the hooves:


Step seven
To describe the lower legs, bring together up the hoof with the wrist/heel. If y'all want to make them more realistic, make the lines curve inward.


Step 8
Now join upwards the wrist with the elbow, and the heel with the bum.


3. Draw the Head
Step 1
Starting time by drawing the neck—a single curved line.


Step 2
Attach a line to the neck. This will be the base of operations of the head.


Footstep 3
Draw two circles on the line. Make 1 very big (the head) and one smaller (the snout).


Pace iv
Draw the eye, the nose, and the smile.


Step v
Bring together the ii "head-circles" with gentle lines to complete the caput.


Stride 6
At present join the head with the body by drawing two lines like to the neck-line.


4. Add Details
Step 1
To draw an ear, draw a line from the middle of the head.


Step ii
And so bring together it with the head, creating a "curved triangle".


Step 3
Draw the mane in whatever manner you desire.


Step 4
Put a circle at the end of the bum to create the base for a tail.


Step 5
Draw a curved line to show where the tail will become.


Footstep six
Draw an oval "fastened" to the line.


Pace 7
Y'all tin now outline the lines to create the tail.


v. Create the Final Drawing
Pace ane
The base is done! This is where the actual cartoon starts. Take a ball-bespeak pen or anything that creates dark lines, and draw over the sketch. You can fix any mistakes now.

Step 2
Take the second sheet of paper and put it correct over the other. You lot should meet the lines of the sketch underneath. If non, you can use a window to see it.


Step 3
Let's get dorsum to drawing. This time we're working on the real picture, so be more careful. Yous can also use darker lines.
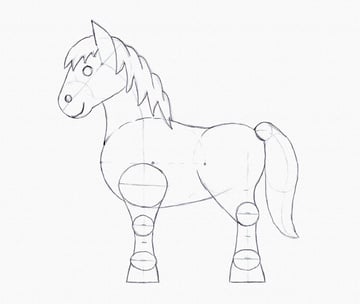
Draw an outline of the body using the shapes you can run across beneath.


Pace 4
Draw the hooves with two elementary lines.


Step five
Draw the mane and tail. If you want, you can use a lot of lines to make it fluffy.


Stride 6
Outline the eye, nose, and smiling. Draw a spot of lite in the eye.


Footstep vii
Fill the eye and nose past drawing tiny circles within.


Step 8
You tin at present remove the sheet underneath and stop the drawing. For instance, you can create hair past drawing brusk lines all over the main outline. Y'all can also add another pair of legs.


Congratulations!
You've fabricated information technology! But hey, it'due south not the end! Do you remember that part where we were cartoon hooves, wrists, heels, and elbows? These volition be important for the next part of this tutorial, in which nosotros'll be learning how to depict a running pony!
Source: https://design.tutsplus.com/tutorials/drawing-for-kids-draw-a-pony--cms-24701